Smooth Out Your 350 Chevy's Idle: The Magic of Valve Adjustment
The iconic small-block Chevy 350. A powerhouse of American automotive history, capable of everything from gentle cruising to high-octane racing. But even this legendary engine can suffer from a rough idle, robbing it of its smooth power delivery and potentially causing long-term damage. One often-overlooked solution? Proper valve adjustment. This seemingly simple procedure can dramatically improve your 350's performance and longevity. Let's delve into the why, how, and what to expect when tackling this vital maintenance task.
Why is Valve Adjustment Important for a Smooth Idle?
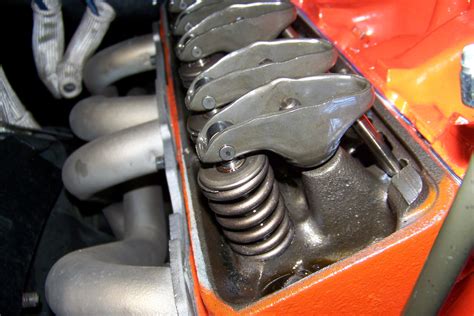
Your engine's valves are responsible for precisely controlling the intake and exhaust of the air-fuel mixture. If they're not adjusted correctly, several problems can arise, directly impacting your idle:
-
Insufficient Intake: Incorrect valve lash (the clearance between the valve and rocker arm) can prevent the intake valve from opening fully. This leads to a lean fuel mixture, resulting in a rough, erratic idle, potential misfires, and reduced power.
-
Incomplete Exhaust: Similarly, improperly adjusted exhaust valves might not close completely. This allows exhaust gases to leak back into the combustion chamber, affecting the next cycle and leading to a rough idle, decreased compression, and power loss.
-
Burned Valves: Overly tight valve adjustment can put excessive strain on the valve train components, eventually leading to burned or damaged valves, a costly repair.
How Often Should I Adjust My 350 Chevy's Valves?
The frequency of valve adjustments depends on several factors, including the engine's mileage, the type of camshaft (hydraulic or solid lifter), and driving habits. As a general guideline:
-
Hydraulic Lifters: These self-adjusting lifters usually require adjustment only when significant wear occurs, often signaled by a noticeable change in idle quality. However, checking them every 30,000-50,000 miles is advisable.
-
Solid Lifters: Solid lifter engines necessitate more frequent valve adjustments, typically every 5,000-10,000 miles, depending on the driving conditions.
What Tools Do I Need for Valve Adjustment?
Before you begin, gather the necessary tools:
- Valve adjustment wrench: This specialized wrench is essential for accurately adjusting the valve lash. The size depends on your engine’s specifics.
- Feeler gauges: These thin metal strips are used to measure the valve lash clearance.
- Socket wrench set: To remove rocker arm covers and other components.
- Torque wrench: For correctly tightening bolts and ensuring proper valve cover sealing.
- Owners Manual: Consult your specific engine's specifications for precise torque values and valve lash measurements.
- Mechanic's gloves and safety glasses: Protecting yourself is paramount.
How to Adjust Valves on a 350 Chevy Engine: A Step-by-Step Guide
This is a simplified overview; always consult a detailed repair manual specific to your engine for precise instructions.
-
Prepare the Engine: Disconnect the negative battery terminal. Warm the engine slightly to allow for accurate measurement.
-
Remove the Valve Covers: Access the valve train by carefully removing the valve covers.
-
Locate the Rocker Arms: Identify the intake and exhaust rocker arms for each cylinder.
-
Rotate the Engine: Using a wrench on the crankshaft, carefully rotate the engine to position each cylinder at Top Dead Center (TDC) on the compression stroke. This ensures the valves are in the correct position for adjustment.
-
Measure and Adjust Valve Lash: Use the feeler gauges to measure the existing valve lash. Adjust using the valve adjustment wrench, ensuring the specified clearance is achieved.
-
Repeat for All Cylinders: Repeat steps 4 and 5 for each cylinder, following the firing order.
-
Reassemble: Reinstall the valve covers, carefully tightening the bolts to the manufacturer's specified torque.
-
Start the Engine and Check Idle: Start the engine and observe the idle quality.
What if My Idle is Still Rough After Valve Adjustment?
If the idle remains rough after adjustment, consider these possibilities:
-
Incorrect Adjustment: Double-check your work to ensure accurate valve lash.
-
Other Issues: A rough idle could also indicate problems with the ignition system, carburetor (or fuel injection system), vacuum leaks, or other engine components.
Troubleshooting Common Valve Adjustment Issues
H2: My engine is hard to start after valve adjustment. What could be the cause?
A difficult start post-valve adjustment might indicate an incorrect valve lash setting. Too tight an adjustment can hinder proper valve opening and compression. Recheck the lash using feeler gauges and ensure it's within the manufacturer's specifications.
H2: I’ve adjusted the valves, but my idle is still rough. What should I check next?
If the valve adjustment doesn't resolve the rough idle, the problem likely lies elsewhere. Inspect for vacuum leaks, ignition issues (spark plugs, wires, distributor), and problems with the carburetor or fuel injection system. A compression test can also pinpoint mechanical issues within the cylinders.
H2: Can I adjust my valves myself, or should I take it to a mechanic?
While valve adjustment is a doable DIY project for mechanically inclined individuals, it requires precision and careful attention. If you lack experience, it's safer to seek professional help. Incorrect adjustment can cause engine damage.
Proper valve adjustment is a crucial aspect of maintaining a smooth-running 350 Chevy engine. By understanding the process and taking the necessary precautions, you can enjoy the satisfying purr of a well-tuned small block, maximizing performance and longevity. Remember to always consult a repair manual specific to your engine for detailed instructions and specifications.

