RV Battery Connections: Avoid Common Wiring Mistakes
Properly connecting your RV batteries is crucial for reliable power and the safety of your RV and yourself. Improper wiring can lead to everything from a dead battery to a fire. This comprehensive guide will walk you through the essential steps, highlighting common mistakes to avoid and best practices for ensuring a secure and efficient battery system.
Why Correct RV Battery Connections Matter
Your RV's battery system powers everything from lights and appliances to your air conditioner and water pump. A poorly connected battery system can lead to:
- Dead batteries: Loose connections create resistance, draining your batteries faster.
- Corrosion: Poor connections can accelerate corrosion, damaging your battery terminals and wiring.
- Voltage drops: Resistance in the wiring causes voltage drops, meaning your appliances won't receive the power they need to operate correctly.
- Fire hazards: Loose connections and improperly sized wiring can overheat, potentially leading to a fire.
Understanding the correct wiring procedures is paramount to avoid these problems and ensure a safe and reliable power supply for your RV adventures.
Common RV Battery Wiring Mistakes
Several common mistakes plague RV battery systems. Let's address them directly:
1. Loose Connections:
This is perhaps the most frequent and easily avoidable mistake. Loose connections create resistance, leading to voltage drops and excessive heat buildup. Always ensure your connections are tight and secure. Use a wrench to tighten terminals, rather than relying solely on hand-tightening.
2. Corroded Terminals:
Corrosion significantly impairs the conductivity of your battery terminals. Regularly clean terminals with a wire brush and baking soda solution to maintain optimal conductivity. Consider applying a corrosion inhibitor for long-term protection.
3. Incorrect Wire Gauge:
Using the wrong wire gauge is a serious mistake. Too thin a wire will overheat and potentially melt, creating a fire hazard. Always use appropriately sized wiring that can handle the amperage draw of your RV's electrical system. Consult a wiring chart or an electrician if you're unsure.
4. Incorrect Polarity:
Connecting the positive (+) and negative (-) terminals incorrectly can cause serious damage to your electrical system, possibly leading to a short circuit and fire. Double and triple-check the polarity before making any connections.
5. Neglecting Grounding:
A proper ground is essential for a safe and efficient electrical system. Ensure your RV's chassis is properly grounded, providing a return path for the current. A poor ground can lead to many of the previously mentioned problems.
6. Using the Wrong Type of Connectors:
Using corroded or inappropriate connectors can create resistance and lead to overheating. Ensure your connectors are designed for the voltage and amperage of your system and are correctly installed. Always use high-quality connectors.
7. Inadequate Cable Management:
Poor cable management leads to pinched or damaged wires, leading to resistance and possible short circuits. Keep your wires organized, secured, and away from sharp objects.
How to Properly Connect Your RV Batteries
Here's a step-by-step guide to ensure your RV battery connections are safe and effective:
- Clean the terminals: Thoroughly clean the battery terminals with a wire brush and baking soda solution.
- Apply corrosion inhibitor: After cleaning, apply a corrosion inhibitor to protect the terminals from future corrosion.
- Check polarity: Double-check that you are connecting the positive (+) cable to the positive terminal and the negative (-) cable to the negative terminal.
- Secure the connections: Tighten the connections securely using a wrench. Do not overtighten.
- Inspect the wires: Check for any signs of damage or wear on the wires. Replace any damaged wires.
- Manage cables: Secure cables to prevent them from rubbing against sharp edges or becoming entangled.
- Test the connections: Use a multimeter to test the voltage at the battery terminals and at the various points in your electrical system to ensure there is no significant voltage drop.
Addressing Specific Scenarios:
What to do if your RV battery is not charging?
Several factors can cause a non-charging battery, starting with checking the connections for corrosion, looseness, or incorrect polarity. Then inspect your charging system components (alternator, converter, solar panels).
How do I add a second battery to my RV?
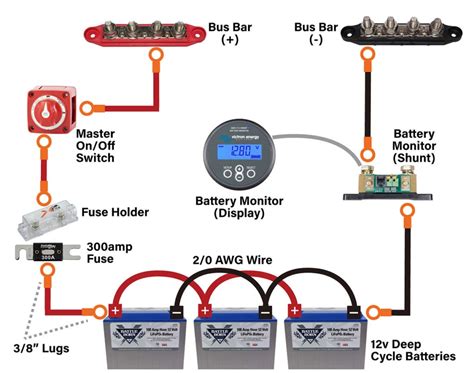
Adding a second battery requires careful planning to correctly configure a parallel or series setup, dependent on your needs. Consulting a qualified electrician or a comprehensive guide specifically on RV battery installation is highly recommended to avoid wiring mistakes.
My RV battery keeps dying. What could be wrong?
A dying battery can be caused by many factors, including faulty connections, parasitic draws (appliances drawing power even when switched off), a faulty charging system, or a simply old battery that needs replacement. Systematic troubleshooting is required.
By following these guidelines and avoiding these common mistakes, you can ensure a safe, efficient, and reliable power supply for your RV adventures. Remember, if you're unsure about any aspect of RV battery wiring, it's always best to consult a qualified electrician. Your safety and the longevity of your RV's electrical system are worth the investment.

