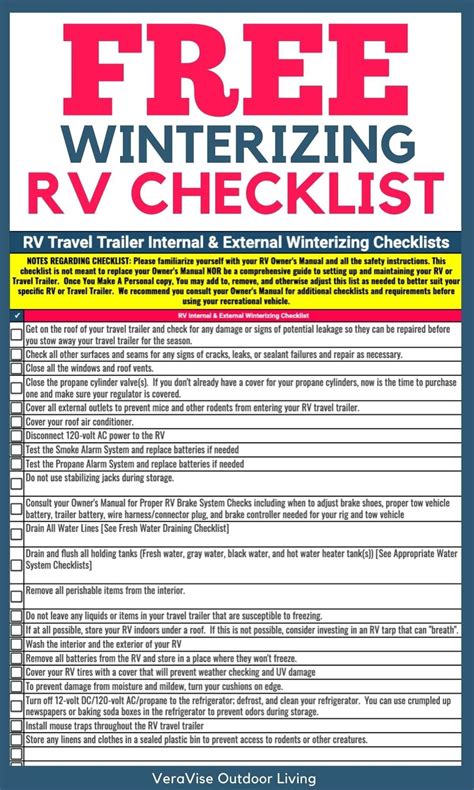
RV Antifreeze: Your Checklist for Winter Storage
Winterizing your RV is crucial to prevent costly damage from freezing temperatures. A key component of this process is using RV antifreeze, a non-toxic solution designed to protect your plumbing system from freezing and cracking. This comprehensive checklist will guide you through the process, ensuring your RV is properly protected for the winter months.
Why is RV Antifreeze Necessary?
Water expands when it freezes, and this expansion can cause significant damage to your RV's plumbing system, including burst pipes, cracked tanks, and damaged water pumps. RV antifreeze, unlike automotive antifreeze (which is toxic), is specifically formulated to be non-toxic and safe for your RV's systems. It lowers the freezing point of the water in your pipes, preventing ice formation and safeguarding your valuable investment.
What Type of RV Antifreeze Should I Use?
There are two primary types of RV antifreeze: pink and blue. Pink antifreeze is typically propylene glycol-based and is the most commonly recommended type. It's non-toxic and biodegradable, making it a safer choice for the environment. Blue antifreeze is often methanol-based and is generally less expensive, but it’s also more toxic and less environmentally friendly. Always choose pink, propylene glycol-based RV antifreeze.
Step-by-Step Winterization Checklist with RV Antifreeze
This checklist assumes your RV is already prepared for winter storage, with any unnecessary items removed.
1. Empty and Flush the Water System:
- Drain the fresh water tank: Open the drain valve and let the tank empty completely.
- Flush the water lines: Turn on all faucets (hot and cold) and let the water run until it’s completely drained. If you have a water heater, drain it according to the manufacturer’s instructions.
- Drain low-point drains: Locate and open the low-point drains, usually found under the RV, to remove any remaining water from the plumbing system.
2. Add RV Antifreeze to the System:
- Bypasses: Locate your water pump bypass valves (most RVs have them). These allow you to bypass the water pump while using antifreeze. Open the bypass valves.
- Pour antifreeze into the low points: Pour the pink RV antifreeze directly into each low-point drain. This ensures the system is completely saturated.
- Use a pump: Some RV owners prefer using a small water pump to circulate the antifreeze through the system, ensuring thorough coverage.
- Open faucets and run toilets: While continuing to pour antifreeze, turn on each faucet (hot and cold), the shower, and flush the toilets. Continue until pink antifreeze comes out of each fixture.
3. Treat the Water Heater (If Applicable):
- Drain and refill: After draining your water heater, refill it with the appropriate amount of RV antifreeze according to the manufacturer’s instructions.
4. Winterize the Water Pump:
- Drain the pump: After treating your system, you should either drain your water pump (by disconnecting it and draining any water) or you can fill the pump with antifreeze, but this is only recommended on particular models. Consult your owner's manual.
5. Protect Exposed Pipes:
- Insulation: Consider using heat tape or insulation to protect any exposed pipes or lines that might still be vulnerable to freezing.
6. Final Checks:
- Check for leaks: Carefully inspect all connections and fittings for any leaks after adding antifreeze.
- Inspect the antifreeze level: Make sure you've added enough antifreeze to all lines and tanks to ensure thorough protection.
Frequently Asked Questions (FAQs)
How much RV antifreeze do I need?
The amount of RV antifreeze needed varies depending on the size and complexity of your RV's plumbing system. Check your RV's owner's manual for specific recommendations, or consult a qualified RV technician.
Can I use automotive antifreeze in my RV?
No, absolutely not. Automotive antifreeze is toxic and can cause serious health problems if ingested or if it comes into contact with your skin. Always use RV antifreeze, which is specifically formulated to be non-toxic.
What happens if I don't winterize my RV?
Failing to winterize your RV can lead to severe damage from frozen pipes, including burst pipes, cracked tanks, and damaged water pumps. These repairs can be extremely costly.
How do I de-winterize my RV in the spring?
De-winterizing your RV involves flushing the antifreeze from the system and refilling it with fresh water. This process is the reverse of winterizing.
Can I leave my RV antifreeze in the system all year?
While it's not harmful to leave RV antifreeze in your system for an extended period, it's best to flush it out and use fresh water in your plumbing system once the winter season is over.
By following this checklist and addressing the frequently asked questions, you can effectively winterize your RV and protect it from costly freeze damage. Remember to always consult your RV's owner's manual for specific instructions and recommendations. Happy winter camping!

