Rock Your Wiring: Easy Rocker Switch Panel Diagram
Building a custom rocker switch panel can drastically improve the look and functionality of your vehicle, boat, or even a home project. But the wiring can seem intimidating. This guide will walk you through creating an easy-to-understand rocker switch panel diagram, ensuring your project is a success. We'll cover everything from choosing the right components to troubleshooting common issues.
What You'll Need for Your Rocker Switch Panel
Before diving into the diagram, let's gather the necessary components. This ensures a smooth and efficient process.
-
Rocker Switches: Choose switches with the appropriate amperage rating for your intended load. Consider single-pole, single-throw (SPST) switches for simple on/off functions, or more complex switches for specialized applications. Think about the aesthetics—matching your overall style is key.
-
Switch Panel: Select a panel that fits your desired size and mounting location. Consider material (metal, plastic), finish (matte, gloss), and the number of switch cutouts.
-
Wiring: Use appropriately sized wiring for each circuit. Thicker gauge wire is needed for higher amperage loads. Properly color-coded wire makes tracing and troubleshooting much easier.
-
Connectors: Crimp connectors, solder, and heat shrink tubing are crucial for creating secure and reliable connections. Don’t skimp on this—safe wiring is paramount.
-
Fuse Block (Highly Recommended): Protecting your circuits with a fuse block is essential to prevent damage from short circuits and overloads.
-
Power Source: This will depend on your application. It could be a car battery, a boat's electrical system, or a household power supply.
-
Loads: This refers to what each switch will control—lights, fans, pumps, etc. Understanding the amperage draw of each load is crucial for choosing the correct switches and wiring.
Creating Your Rocker Switch Panel Diagram
Now, let's build your diagram. A well-drawn diagram prevents wiring mistakes and simplifies troubleshooting.
-
Identify Your Loads and Switches: List each device you want to control with a switch. Note the amperage draw of each device.
-
Assign Switches: Allocate a switch to each load. Label each switch clearly on your diagram (e.g., "Headlights," "Interior Lights," "Auxillary Power").
-
Determine the Power Source: Indicate the positive (+) and negative (-) terminals of your power source on the diagram.
-
Layout the Wiring: Draw lines representing the wiring from the power source, through the fuse block (if used), to each switch, and finally to the load.
-
Include Fuses: If using a fuse block, clearly indicate the fuse rating for each circuit.
-
Add Grounding: Show the ground connection for your panel and each load. A clean, secure ground is vital for proper operation.
-
Use Symbols: Use standard electrical symbols for switches, fuses, and loads. This makes your diagram universally understandable.
-
Label Everything Clearly: Include notes for wire gauge, fuse ratings, and any other relevant information.
Example Diagram (Simplified):
+12V (Battery) --> Fuse (10A) --> Switch 1 (Headlights) --> Headlights --> Ground
+12V (Battery) --> Fuse (5A) --> Switch 2 (Interior Lights) --> Interior Lights --> Ground
H2: How to Wire a Simple On/Off Rocker Switch
This explains the fundamental wiring for a single SPST (Single-Pole, Single-Throw) rocker switch.
-
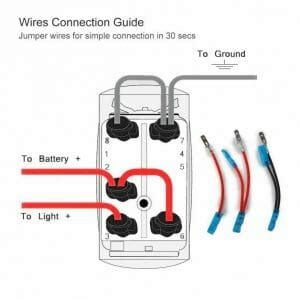
Connect the Power: Wire the positive (+) terminal of your power source to the “IN” terminal of the switch (often the common terminal).
-
Connect the Load: Wire the output terminal of the switch ("OUT") to the positive (+) terminal of your load.
-
Connect the Ground: Wire the negative (-) terminal of your load to the ground point of your system.
H2: What Gauge Wire Do I Need for My Rocker Switches?
The wire gauge you need depends entirely on the amperage draw of your load. Using too thin a wire can lead to overheating and potential fire hazards. Consult a wire gauge chart to determine the appropriate gauge for your specific application. This information is readily available online.
H2: How Do I Troubleshoot a Problem with My Rocker Switch Panel?
Troubleshooting starts with your diagram! Trace the wiring systematically. Check fuses, connections, and the switches themselves. Use a multimeter to test for voltage and continuity to identify the fault.
Conclusion
Building a custom rocker switch panel is a rewarding project. By creating a detailed diagram and following safety precautions, you can successfully install and enjoy your new, functional panel. Remember, safety first—always double-check your wiring and connections before applying power.

