Perfect Pole Shed Alignment: A DIY Guide
Building a pole shed is a rewarding DIY project, offering versatile storage and workspace. However, achieving perfect alignment is crucial for structural integrity and longevity. A misaligned shed can lead to uneven floors, sticking doors, and even structural instability. This guide provides a step-by-step approach to ensure your pole shed is perfectly aligned from the ground up. We'll cover everything from initial site preparation to final adjustments, empowering you to build a shed you can be proud of.
Why is Pole Shed Alignment so Important?
Before diving into the process, let's understand why precise alignment is paramount. A perfectly aligned pole shed ensures:
- Structural Stability: Uneven foundations can lead to stress on the structure, potentially causing cracks, leaning, and even collapse over time.
- Level Floors: An uneven foundation translates directly into uneven flooring, making the shed impractical for storing items or working comfortably.
- Proper Door and Window Function: Misalignment can cause doors and windows to stick, jam, or fail to close properly, compromising security and weatherproofing.
- Aesthetic Appeal: A perfectly aligned shed looks more professional and adds value to your property.
Planning and Site Preparation: The Foundation of Success
Accurate alignment begins long before you set the first post. Thorough planning is key:
- Choose a Level Site: Select a relatively flat area for your shed. Minor slopes can be compensated for, but significant unevenness will complicate the process.
- Survey the Area: Use a surveyor's level or a laser level to determine the highest and lowest points on your chosen site. This helps determine the amount of leveling needed.
- Mark the Perimeter: Precisely mark the corners of your shed’s foundation using stakes and string. Double-check your measurements to ensure accuracy. Consider using batter boards for added stability.
- Excavate and Level: Excavate the area according to your chosen foundation type (concrete piers, gravel pads, etc.). Ensure the foundation is perfectly level, using a level and a tamper to achieve a smooth, even surface.
Setting the Corner Posts: Achieving Perfect Squareness
This is the critical stage where precise alignment is essential.
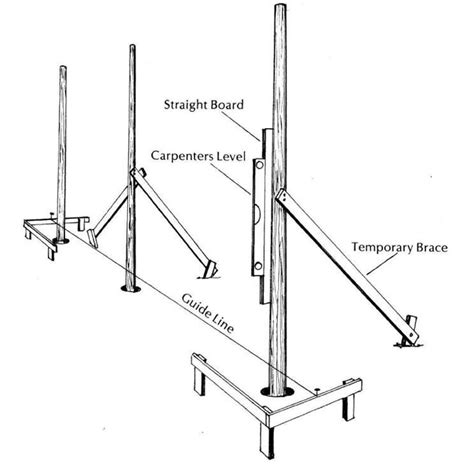
- Use a Plumb Bob: Ensure each corner post is perfectly plumb (vertical) using a plumb bob. Any deviation will cause problems later on.
- Establish Squareness: Use a measuring tape and the Pythagorean theorem (a² + b² = c²) to check that your corners form perfect 90-degree angles. Measure the diagonals—they should be equal. Adjust the post positions as needed until perfect squareness is achieved.
- Secure the Posts: Once you're satisfied with the alignment, firmly secure the corner posts to the foundation using concrete, brackets, or other appropriate methods.
How do I make sure my pole barn is square?
Ensuring your pole barn is square requires careful measurement and adjustment. Using the Pythagorean theorem (a² + b² = c²) is the most accurate method. Measure the diagonals of your structure (from corner to opposite corner). If the diagonals are equal, your structure is square. If not, adjust the posts until the diagonals are equal. This process should be repeated throughout the construction process to ensure continued squareness.
What tools do I need for pole barn alignment?
Precise alignment demands the right tools. Essential tools include:
- Surveyor's Level or Laser Level: For accurate leveling of the foundation.
- Plumb Bob: To verify the verticality of the posts.
- Measuring Tape: For precise measurements and checking squareness.
- Post Hole Digger: For digging holes for the posts.
- Shovel: For leveling and grading the ground.
- Level: For verifying the levelness of the foundation and posts.
How do I adjust post alignment after setting?
Minor post alignment adjustments before concreting are possible. Use a pry bar or leverage to carefully reposition slightly off-kilter posts. However, significant adjustments will require removing and resetting the posts. Prevention is always better than cure!
Constructing the Frame: Maintaining Alignment Throughout
Once the corner posts are set, continue construction, regularly checking for alignment:
- Intermediate Posts: Place intermediate posts plumb and aligned with the corner posts.
- Regular Checks: Use your level and measuring tape frequently to ensure all components remain aligned throughout the framing process.
- Diagonal Bracing: Install diagonal bracing to add rigidity and further ensure the structure remains square.
Final Touches and Inspections
Before adding the roof and siding, perform a final inspection to ensure everything is aligned correctly. Any minor adjustments should be made at this stage.
By following these steps and using precise tools, you can confidently build a perfectly aligned pole shed that will stand the test of time. Remember, precision in the initial stages saves time and effort later. Accurate alignment is the foundation of a strong and aesthetically pleasing structure.

