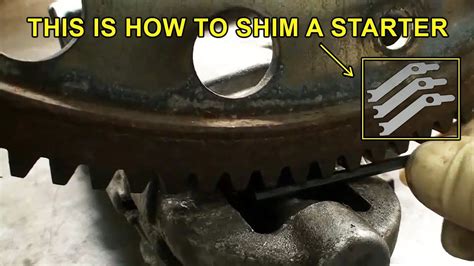
Is Your Starter Acting Up? Learn How to Shim It
A cranky starter motor can turn a pleasant morning into a frustrating ordeal. That grinding noise, that hesitant engagement… it's a common problem that often points to a simple fix: shimming. This article will guide you through understanding why your starter might need shimming and how to perform the procedure safely and effectively. We'll cover everything from identifying the problem to the tools you'll need, ensuring you're equipped to tackle this common automotive issue.
Why Does My Starter Need Shimming?
The starter motor's job is crucial: to crank your engine and get it running. It does this by engaging a gear (the bendix gear) with the engine's flywheel. If this engagement isn't precise, you'll hear that dreaded grinding noise. This often indicates the starter gear isn't meshing correctly with the flywheel ring gear. The gap between the two is too large, causing the starter to spin without effectively turning the engine. This is where shimming comes in. Shimming adjusts the distance, ensuring proper alignment and engagement.
What Causes Improper Engagement?
Several factors contribute to an improper starter-to-flywheel engagement:
- Worn Flywheel Teeth: Over time, the teeth on your flywheel can wear down, increasing the distance between the starter gear and the flywheel.
- Worn Starter Gear: Similarly, the starter gear itself can wear, leading to the same issue.
- Misalignment: The starter motor itself might be slightly misaligned, creating an inconsistent engagement.
- Engine Wear and Tear: General wear and tear on the engine and its components can contribute to this problem.
How to Tell If Your Starter Needs Shimming
Before you jump into shimming, accurately diagnose the issue. Grinding noises during startup are a strong indicator, but other signs might include:
- Slow cranking: The engine cranks slowly or hesitates before starting.
- Intermittent starting: The starter works sometimes but fails other times.
- Clicking sound: A rapid clicking sound might indicate the starter solenoid is engaging but the starter gear isn't catching.
Tools and Materials You’ll Need
Before you begin, gather the necessary tools. This list may vary depending on your vehicle, but generally includes:
- Shims: These are thin metal plates of varying thicknesses. You'll likely need a few different thicknesses to fine-tune the engagement. The correct shim thickness will depend on your vehicle's specific needs. Consult a repair manual for your make and model to determine the proper shim sizes.
- Socket wrench set: To remove and install the starter motor.
- Torque wrench: Essential for tightening bolts to the manufacturer's specified torque. Over-tightening can damage components.
- Jack and jack stands (or ramps): For safe and easy access to the starter motor.
- Repair manual: Crucial for vehicle-specific instructions and torque specifications.
- Gloves and safety glasses: Protect your hands and eyes.
- Wrench: For loosening and tightening the starter motor bolts.
- Cleaning materials: To remove any dirt or debris from the starter and flywheel area.
Step-by-Step Guide to Shimming Your Starter
This process is complex and varies significantly depending on your vehicle. Always consult your vehicle's repair manual for precise instructions and torque specifications. The following is a general overview and should not be considered a complete guide for all vehicles:
- Disconnect the battery: This is crucial for safety.
- Access the starter motor: Use a jack and jack stands to safely lift your vehicle and gain access to the starter.
- Remove the starter motor: Disconnect the electrical connections and remove the starter motor bolts.
- Inspect the starter and flywheel: Look for any signs of damage or wear on both the starter gear and flywheel teeth.
- Add shims: Carefully add shims between the starter motor and the engine block, one at a time. Start with the thinnest shim and test the engagement. You might need to experiment with different shim combinations to achieve optimal meshing.
- Reinstall the starter motor: Carefully reassemble the starter, ensuring all bolts are tightened to the correct torque specification (check your repair manual).
- Reconnect the battery: Once everything is securely reassembled, reconnect the battery.
- Test the starter: Attempt to start the engine. Listen carefully for any grinding noises. If grinding persists, additional shimming may be necessary. If the starter engages smoothly, you’ve successfully shimmed your starter!
What if Shimming Doesn't Solve the Problem?
If shimming doesn't fix the issue, the problem could be more serious. Possible causes include a faulty starter motor, a damaged flywheel, or other related mechanical issues. In such cases, professional help from a qualified mechanic is recommended. Attempting to repair more complex issues without the right expertise could cause further damage.
Can I Shim My Starter Myself?
While shimming is a relatively simple procedure for some mechanically inclined individuals, it requires precision and a solid understanding of automotive mechanics. If you're unsure about your abilities, it's better to seek professional help. Incorrect shimming can lead to further damage and potentially costly repairs.
This guide provides a general overview. Always refer to your vehicle's specific repair manual for detailed instructions. Remember safety first! Always disconnect the battery before starting any work on your vehicle's electrical system.

