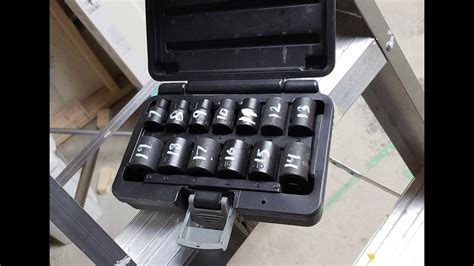
How to Mark Tools with Paint: Tips and Tricks for Lasting Identification
Identifying your tools quickly and easily is crucial for efficiency and preventing costly mistakes. While labeling with tape can work, paint offers a more durable and often more visible solution. This comprehensive guide provides tips and tricks for effectively marking your tools with paint, ensuring clear, long-lasting identification. We’ll cover everything from choosing the right paint to applying it correctly and dealing with common challenges.
What Type of Paint is Best for Marking Tools?
Choosing the right paint is the foundation of a successful tool-marking project. Several options exist, each with its advantages and disadvantages:
-
Acrylic Enamel: This is a popular choice due to its durability, fast drying time, and wide range of colors. It adheres well to metal and most other tool materials. Look for a high-quality, outdoor-grade acrylic enamel for maximum longevity.
-
Spray Paint: Spray paint offers quick coverage, especially for larger tools or multiple tools at once. Choose a rust-resistant formula for optimal protection and durability. Remember to work in a well-ventilated area and follow safety precautions.
-
High-Temperature Paint: For tools that get extremely hot (like welding equipment), a high-temperature paint is essential. These paints can withstand intense heat without cracking or peeling.
-
Specialty Paints: Consider specialized paints designed for plastics or specific metals if needed. Always check the paint's compatibility with your tool material before applying.
Which paint is right for you? The best choice depends on the type of tools you’re marking, the environment they'll be used in, and your personal preference. For most general-purpose tools, acrylic enamel is an excellent starting point.
Preparing Your Tools for Painting
Proper preparation is key to ensuring the paint adheres well and lasts. Follow these steps:
-
Clean the Surface: Remove any dirt, grease, rust, or old paint from the tool's surface using a wire brush, sandpaper, or a suitable cleaning solvent. A clean surface guarantees optimal adhesion.
-
Mask Off Areas: If you only want to paint a specific section of the tool, use painter's tape to mask off the areas you want to protect.
-
Prime (Optional): For enhanced adhesion and a smoother finish, consider applying a primer specifically designed for metal. This is especially helpful with rusty or heavily worn tools.
Applying the Paint: Techniques and Tips
Here's how to apply your chosen paint for best results:
-
Thin Coats: Apply several thin coats rather than one thick coat. Thin coats dry faster and reduce the risk of drips and runs. Allow each coat to dry completely before applying the next.
-
Even Application: Use a steady hand when applying paint with a brush or roller. For spray paint, maintain a consistent distance and use even, sweeping motions.
-
Let it Dry: Allow ample drying time before using the tools. Check the paint manufacturer's instructions for recommended drying times.
-
Multiple Colors: For complex identification schemes, use multiple colors. For example, a color code system for different tool types or even individual owner identification.
How to Choose Your Marking System
Effective tool marking requires a thoughtful system. Consider these ideas:
-
Color Coding: Assign colors to different tool types (e.g., red for plumbing, blue for electrical).
-
Numbering System: Assign unique numbers to individual tools for easy inventory and tracking.
-
Combination System: Combine color coding and numbering for a highly effective system.
-
Stencils: Use stencils to create crisp lettering or numbers, particularly useful for numbering systems.
What's the Best Way to Paint Numbers on Tools?
Using stencils or masking tape to create straight lines and numbers produces the best results when painting numbers on your tools. Precision is key for easy readability. Thin brushes or even fine-tipped paint markers work well for detailed numbering.
How Long Does Paint Last on Tools?
The longevity of your paint job depends on the paint type, application, and the environment your tools are used in. High-quality acrylic enamel or specialty paints should provide several years of durability, even under demanding conditions. Proper preparation and application significantly increase the lifespan of your paint markings.
Maintaining Your Painted Tool Marks
To keep your painted markings visible and legible:
-
Clean Regularly: Wipe tools clean after each use to remove dirt and debris.
-
Touch-Ups: Perform periodic touch-ups as needed. A small amount of paint can easily restore faded markings.
By following these tips and tricks, you can ensure your tools remain clearly marked and easily identifiable for years to come, improving efficiency and safety in your workspace. Remember, choosing the right paint, preparing the tools properly, and applying the paint correctly are the keys to success.

