Boost Your Driving Safety: A Comprehensive DRL Wiring Guide
Driving safety is paramount, and even small additions to your vehicle can significantly improve visibility and reduce accident risk. Daytime Running Lights (DRLs) are a crucial safety feature, automatically illuminating your headlights during the day, making your vehicle more noticeable to other drivers. While many modern cars come equipped with DRLs, older vehicles or those lacking this feature can benefit greatly from an aftermarket installation. This guide will walk you through the process of wiring DRLs, ensuring a safe and effective installation.
Disclaimer: This guide provides general information and should not be considered professional advice. Always consult your vehicle's owner's manual and, if unsure, seek the help of a qualified automotive electrician. Improper wiring can damage your vehicle's electrical system.
Why Install DRLs?
Before we dive into the wiring, let's reiterate the importance of DRLs. Studies consistently show a significant reduction in accidents, particularly head-on collisions, in vehicles equipped with DRLs. This is because they increase the vehicle's visibility, especially in bright sunlight or adverse weather conditions. Essentially, DRLs act as a constant visual alert to other road users, improving overall road safety.
What You'll Need:
To successfully wire your DRLs, you'll need the following:
- DRL Kit: Choose a kit appropriate for your vehicle's voltage (typically 12V). The kit should include the lights themselves, wiring harness, relay, and fuse.
- Wire Strippers/Cutters: For preparing the wires for connections.
- Electrical Tape: To insulate connections and prevent short circuits.
- Crimp Connectors: For secure wire connections.
- Soldering Iron (Optional): For more robust and permanent connections.
- Multimeter (Optional): To test voltage and circuit continuity.
- Fuse Holder (if not included in the kit): To protect the circuit.
Choosing the Right DRLs:
Several types of DRLs are available:
- LED DRLs: These are energy-efficient and long-lasting, offering a bright, consistent light output.
- Halogen DRLs: A more traditional option, generally less energy-efficient than LEDs.
- Integrated DRLs: These are often integrated into the headlights or front bumper, offering a cleaner, more factory-like appearance.
Consider your vehicle's style and your budget when selecting the appropriate DRLs.
Step-by-Step DRL Wiring Process:
1. Planning the Installation: Before starting, carefully plan the DRL placement. Ensure they comply with local regulations and don't obstruct your view or interfere with other vehicle components.
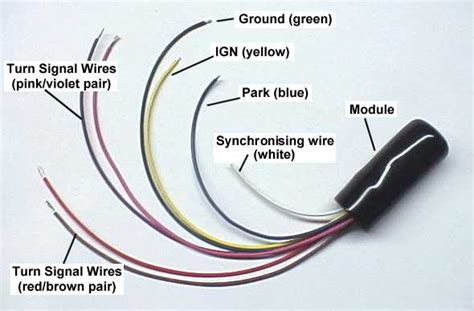
2. Locate the Power Source: Typically, you'll connect the DRLs to the vehicle's switched ignition circuit. This ensures the lights only turn on when the ignition is switched on. A qualified mechanic can advise on the best location to tap into this circuit.
3. Connect the Relay: The relay acts as a switch, protecting the vehicle's electrical system. Follow the instructions provided with your DRL kit to correctly wire the relay. It usually involves connecting the relay's coil to the switched ignition and its contacts to the DRLs' power supply.
4. Wiring the DRLs: Connect the DRLs to the relay's output. Secure the wires with crimp connectors and electrical tape. Ensure all connections are secure and insulated to prevent short circuits.
5. Grounding: Connect the ground wire from the DRLs to a clean, grounded metal surface on your vehicle's chassis.
6. Fuse Protection: Install an inline fuse in the positive wire leading to the DRLs. This protects the circuit from overloads.
7. Testing: Once the wiring is complete, test the DRLs by turning on the ignition. Ensure they illuminate correctly and remain illuminated while the ignition is on.
Troubleshooting:
- DRLs Don't Turn On: Check all connections, fuses, and the relay. Use a multimeter to test for voltage and continuity.
- DRLs Flicker: This might indicate a loose connection or a problem with the power supply.
- DRLs Are Too Bright/Dim: Adjust the brightness settings if your DRLs have such features.
Frequently Asked Questions (FAQ):
H2: Are DRLs legal in my country/state?
DRL regulations vary widely depending on your location. Some countries and states mandate DRLs, while others have specific regulations regarding their brightness and installation. Always check your local laws and regulations before installing DRLs.
H2: Can I wire DRLs myself, or should I hire a professional?
While some individuals are comfortable with automotive electrical work, wiring DRLs requires some electrical knowledge. If you are uncomfortable working with car electrical systems, it’s best to hire a qualified mechanic or automotive electrician to avoid potential damage to your vehicle.
H2: What happens if I don't use a relay?
Connecting DRLs directly to the vehicle's power supply without a relay can overload the circuit, potentially damaging the vehicle's electrical system or even causing a fire. The relay protects the circuit by diverting higher current loads.
H2: How do I choose the right wattage for my DRLs?
The wattage should be compatible with your vehicle's electrical system and chosen power source. Consult your vehicle's owner’s manual and follow the instructions provided with your DRL kit. Selecting the wrong wattage could overload the circuit, causing damage or malfunctions.
H2: How long do DRLs last?
The lifespan of DRLs depends on their type (LED, halogen) and quality. LED DRLs generally last much longer than halogen bulbs. High-quality DRLs can last for several years.
By following these steps and taking necessary precautions, you can safely and effectively install DRLs on your vehicle, significantly improving your safety and visibility on the road. Remember, safety is always the top priority. If you are uncertain about any aspect of the installation process, consult a qualified professional.

