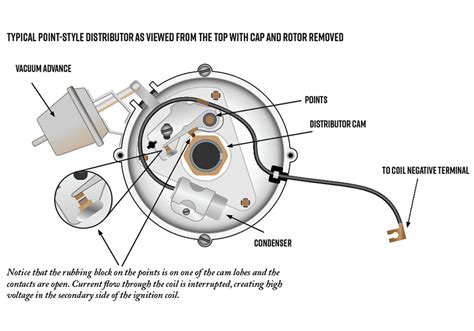
A Mechanic's Secret: Proper Distributor Point Adjustment
For decades, the distributor's points played a crucial role in the ignition system of many vehicles. While modern vehicles have largely transitioned to electronic ignition systems, understanding distributor point adjustment remains relevant for classic car enthusiasts, mechanics working on older vehicles, and anyone interested in the inner workings of internal combustion engines. This article delves into the intricacies of proper distributor point adjustment, revealing the secrets to a perfectly timed and efficient ignition system.
Why is Distributor Point Adjustment Important?
The distributor points act as a switch, opening and closing to create the high-voltage spark that ignites the air-fuel mixture in the engine's cylinders. Precise adjustment is critical because the timing of this spark directly impacts engine performance, fuel efficiency, and overall reliability. Incorrectly adjusted points can lead to several problems:
- Poor engine performance: Mistimed ignition can result in sluggish acceleration, reduced power, and rough idling.
- Reduced fuel efficiency: Improper timing wastes fuel and increases emissions.
- Engine misfires: Incorrect point gap can lead to inconsistent or missed sparks, causing misfires and potential engine damage.
- Premature wear and tear: Incorrectly adjusted points will wear out faster, requiring more frequent replacement.
What Tools Do I Need?
Before starting, gather the necessary tools. This typically includes:
- A feeler gauge: This precisely measures the gap between the points. Having a set with various thicknesses is helpful.
- A dwell meter (optional but recommended): This accurately measures the dwell angle, which indicates the amount of time the points remain closed.
- A screwdriver (usually a Phillips): Used to adjust the point gap.
- A timing light: Essential for verifying the ignition timing after the point adjustment.
- Workshop manual: Specific to the vehicle's make and model, providing detailed instructions and specifications.
How to Adjust Distributor Points: A Step-by-Step Guide
The exact procedure might vary slightly depending on the vehicle, but these steps provide a general overview:
-
Disconnect the negative battery terminal: This is a crucial safety precaution to prevent accidental shocks.
-
Locate the distributor: Usually found on the engine, near the firewall.
-
Remove the distributor cap: This exposes the points and other internal components.
-
Check the point gap: Using the appropriate feeler gauge (the specified gap is usually found in the vehicle's workshop manual), gently insert it between the points. The gauge should fit snugly but not force. If the gap is incorrect, proceed to adjustment.
-
Adjust the point gap: Most distributors have a small screw that allows for point gap adjustment. Carefully turn this screw to achieve the correct gap. Remember, small adjustments make a big difference.
-
Check the dwell angle (optional): If you have a dwell meter, connect it according to the manufacturer’s instructions and measure the dwell angle. This should fall within the specified range in your vehicle's manual. Adjust the points further if needed.
-
Reassemble the distributor cap: Ensure the rotor is properly aligned.
-
Reconnect the negative battery terminal.
-
Verify timing: Use a timing light to confirm that the ignition timing is correct. Refer to your workshop manual for the correct timing specifications. Adjust the distributor's position if necessary.
What is the Correct Point Gap?
This varies significantly depending on the vehicle's make, model, and year. Always consult your vehicle's workshop manual for the correct point gap specification. Attempting to use a generalized gap can lead to poor performance and damage.
What Happens if the Points are Worn?
Worn points will have pitting or uneven surfaces, making it difficult to maintain a consistent gap. They will also likely not provide a clean break, leading to weak sparks or arcing. Worn points need replacement for reliable ignition.
How Often Should I Check and Adjust My Distributor Points?
Routine maintenance is key. A good rule of thumb is to check and adjust the point gap every 6,000 to 10,000 miles or as recommended in your vehicle's maintenance schedule. The frequency depends on the vehicle and driving conditions.
Can I Adjust the Points Without a Dwell Meter?
While technically possible, a dwell meter is highly recommended. It provides an accurate measure of the dwell angle, ensuring the points are not only correctly gapped but also properly timed. Without a dwell meter, achieving optimal ignition timing is more difficult and less precise.
This detailed guide provides a comprehensive understanding of distributor point adjustment. Remember, precision and attention to detail are vital for achieving optimal engine performance and longevity. Always refer to your vehicle's specific workshop manual for detailed instructions and specifications.

