A Comprehensive Guide to Hydraulic Cylinder Take-Apart
Hydraulic cylinders are powerful components found in countless industrial applications, from construction equipment to manufacturing machinery. Understanding how to properly disassemble and reassemble these cylinders is crucial for maintenance, repair, and preventative measures. This comprehensive guide will walk you through the process of a hydraulic cylinder take-apart, focusing on safety, best practices, and troubleshooting. This guide is for informational purposes only and should not replace professional training or manufacturer's instructions. Always consult the specific manual for your cylinder model.
Safety First: Preparing for the Take-Apart
Before you even touch the cylinder, prioritize safety. This is paramount to avoid injury and damage.
- Release System Pressure: This is the most critical step. Ensure the hydraulic system is completely depressurized and isolated. Failure to do this could lead to serious injury from high-pressure fluid jets.
- Use Proper PPE: Personal Protective Equipment (PPE) is essential. This includes safety glasses, gloves (preferably nitrile or equivalent), and potentially a face shield, depending on the cylinder size and condition.
- Clean Work Area: A clean and organized workspace minimizes the risk of dropping or damaging components. Use a clean tarp or mat to protect the cylinder and its parts.
- Gather Necessary Tools: Before you begin, assemble all necessary tools, including sockets, wrenches, hammers (soft-faced if possible), pry bars, and appropriate cleaning materials. A hydraulic cylinder repair kit, including seals and O-rings, should also be on hand if needed.
- Document the Process: Take photos or videos as you disassemble the cylinder. This is invaluable for reassembly and troubleshooting. Label components as you remove them.
Step-by-Step Hydraulic Cylinder Disassembly
The exact steps may vary slightly depending on the cylinder's design and manufacturer, but the general process remains consistent.
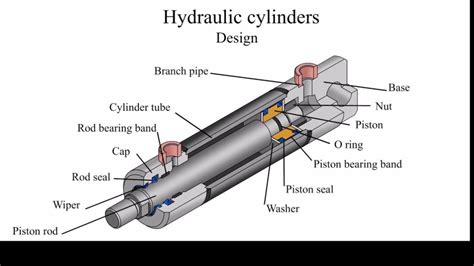
1. Removing the Cylinder Cap
- Identify the Cap: Carefully inspect the cylinder to locate the end cap. This is usually held in place by bolts or nuts.
- Remove Fasteners: Use the appropriate tools to carefully remove the fasteners. Avoid stripping the threads. If bolts are stubborn, use penetrating oil and allow it to soak in for a while.
- Remove the Cap: Once all fasteners are removed, gently remove the end cap. Be prepared for potential fluid leakage, even if the system is depressurized. Use a clean container to collect any spilled fluid.
2. Removing the Piston Rod
- Inspect the Rod: Observe the piston rod for any damage, wear, or corrosion.
- Remove the Rod: Carefully slide the piston rod out of the cylinder body. You may need to use a puller, depending on the design and condition. Take note of the rod's position and orientation.
3. Removing the Piston and Seals
- Remove the Piston: Once the rod is removed, carefully extract the piston from the cylinder body. This usually involves separating the piston from the rod. Take note of the seals and their orientation.
- Inspect Seals and O-rings: Thoroughly inspect all seals, O-rings, and other components for wear, damage, or deterioration. This is crucial for assessing the cylinder's condition and determining the necessary repairs. Replace worn or damaged components.
4. Cleaning the Cylinder Body
- Thorough Cleaning: Thoroughly clean the cylinder body, piston, and all components. Use appropriate solvents and brushes to remove dirt, debris, and old sealant. Avoid using abrasive materials that could scratch the cylinder's internal surfaces.
5. Inspecting for Damage
- Cylinder Body Inspection: Inspect the cylinder body for any signs of damage, scoring, or pitting. These issues could indicate a problem that needs addressing before reassembly.
- Rod Inspection: Examine the piston rod for scoring, bending, or corrosion. A damaged rod needs repair or replacement.
Reassembly: Putting It All Back Together
The reassembly process is essentially the reverse of the disassembly steps. Ensure all seals and O-rings are properly lubricated and installed correctly in their respective grooves. Refer to your documentation and photos throughout this step.
Troubleshooting Common Issues
People Also Ask: What are common problems during a hydraulic cylinder take-apart?
Common problems include stripped bolts, seized components, damaged seals, and difficulty removing the piston rod. Using the correct tools and techniques, as well as penetrating oil where appropriate, can help mitigate these issues.
People Also Ask: How do I know if my hydraulic cylinder seals need replacing?
Signs of worn or damaged seals include fluid leaks, reduced cylinder performance, and erratic operation. Regular inspection is vital for preventative maintenance.
People Also Ask: What type of lubricant should I use when reassembling a hydraulic cylinder?
The appropriate lubricant depends on the cylinder's operating conditions and the manufacturer's recommendations. Always consult the specific manual for your cylinder model.
Conclusion
Disassembling and reassembling a hydraulic cylinder requires careful planning, patience, and adherence to safety protocols. While this guide provides a general overview, always refer to the manufacturer's instructions specific to your cylinder model for detailed procedures and safety information. Remember that improper disassembly or reassembly can lead to costly repairs or even catastrophic failure. If unsure about any step of the process, seek the expertise of a qualified hydraulic technician.

