4L60E: The Art of Precision: Rebuilding Your 4L60E Transmission
The 4L60E transmission, a ubiquitous four-speed automatic found in countless GM vehicles, boasts a reputation for both widespread use and, unfortunately, frequent failure. While its prevalence makes parts readily available, rebuilding this transmission requires precision, patience, and a deep understanding of its intricate workings. This comprehensive guide delves into the art of rebuilding a 4L60E, covering critical aspects from initial assessment to final testing.
Why Rebuilding a 4L60E?
Before embarking on a rebuild, it's crucial to understand why this might be necessary. Common reasons for 4L60E failure include:
- Low Fluid Level: Consistent low fluid levels lead to overheating and premature wear of internal components.
- Fluid Contamination: Contaminated transmission fluid, whether from debris or improper maintenance, accelerates wear and tear.
- Worn Clutch Packs: The friction material in the clutch packs wears down over time, resulting in slipping and eventual failure.
- Sun Shell Damage: The sun shell, a critical component in the planetary gearset, can crack or wear, leading to significant problems.
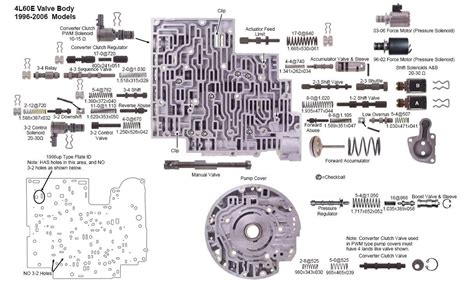
- Valve Body Issues: Problems within the valve body, responsible for controlling fluid flow, can manifest as shifting issues or complete failure.
Diagnosing 4L60E Problems: What's Wrong With My Transmission?
Accurate diagnosis is paramount. Before tearing down your transmission, meticulously identify the problem. Common symptoms include:
- Slipping: The transmission slips between gears, indicating worn clutch packs or low fluid.
- Hard Shifts: Abrupt or harsh shifting suggests valve body issues or low fluid.
- No Shifts: Complete lack of shifting implies a more serious internal problem.
- Whining Noise: A high-pitched whine points towards worn bearings or gears.
- Fluid Leaks: External leaks are a clear indication of seal failure or other damage.
Disassembly and Inspection: A Meticulous Process
Once the 4L60E is removed from the vehicle, meticulous disassembly begins. This process necessitates specialized tools and a clean workspace. Each component—from the valve body to the planetary gearset—must be carefully removed, cleaned, and inspected for wear. This includes:
- Measuring clearances: Precise measurements are essential to determine the condition of components like bearings and shafts.
- Inspecting seals and gaskets: Replace all seals and gaskets regardless of their apparent condition to prevent future leaks.
- Evaluating clutch packs: Examine the friction material on the clutch packs for wear and tear.
What are the common problems found during a 4L60E teardown?
Common issues discovered during teardown include worn clutch packs, damaged sun shell, failing seals, and contaminated fluid. A thorough inspection reveals the extent of the damage, guiding the selection of replacement parts.
How can I identify worn components during a 4L60E rebuild?
Worn components show signs of scoring, excessive wear, or discoloration. Use micrometers and other precision measuring tools to check dimensions against factory specifications.
Reassembly and Calibration: Precision is Key
Reassembly is the mirror image of disassembly, but with added emphasis on precision. Each component must be installed correctly, ensuring proper alignment and clearance. This phase often involves:
- Installing new seals and gaskets: Use only high-quality replacement parts.
- Adjusting valve body clearances: Proper valve body adjustments are critical for smooth shifting.
- Setting up the planetary gearset: Ensure correct alignment and meshing of the gears.
What tools do I need to rebuild a 4L60E transmission?
Specialized tools such as a transmission jack, torque wrench, and various pullers and adapters are required for proper disassembly and reassembly.
What are some tips for successful 4L60E reassembly?
Maintain cleanliness throughout the process, use the correct torque specifications, and double-check every component's installation before moving to the next step.
Testing and Installation: Final Steps
After reassembly, the transmission must be tested to ensure it functions correctly. This typically involves bench testing with specialized equipment. Once confirmed operational, the 4L60E can be reinstalled into the vehicle. Final testing in the vehicle is crucial to confirm proper function.
How do I test a rebuilt 4L60E transmission?
Bench testing uses specialized equipment to simulate driving conditions and check for proper shifting and fluid pressure.
Conclusion: Mastering the 4L60E
Rebuilding a 4L60E transmission is a challenging but rewarding task. Precision, patience, and a thorough understanding of the transmission's internal workings are essential for success. By following these steps and utilizing the appropriate tools and expertise, you can restore your 4L60E to optimal performance. Remember, if you lack the experience or tools, professional assistance is always recommended.

