220V Outlet Installation: Your Questions Answered
Installing a 220V outlet, also known as a 240V outlet in some regions, might seem daunting, but with the right knowledge and precautions, it's a manageable DIY project for many homeowners. This comprehensive guide addresses common questions surrounding 220V outlet installation, helping you understand the process and ensuring your safety. Remember, if you're uncomfortable working with electricity, it's always best to consult a qualified electrician.
Why Do I Need a 220V Outlet?
Many high-power appliances require the higher voltage and amperage provided by a 220V outlet. These typically include:
- Electric ovens and ranges: These appliances demand significant power for cooking.
- Clothes dryers: Electric dryers utilize 220V for efficient operation.
- Electric water heaters: Providing consistent hot water requires a substantial power source.
- Air conditioners (especially window units and some central units): Cooling your home effectively often necessitates a 220V connection.
- Electric car chargers (EV chargers): Charging an electric vehicle quickly requires the higher voltage.
- Hot tubs and spas: These require significant power for heating and operation.
- Welding machines: These industrial tools demand a robust power supply.
What Tools and Materials Will I Need?
Before you begin, gather the necessary materials and tools. This list is a starting point; specific requirements may vary depending on your situation:
- 220V outlet: Choose the correct type and amperage rating (e.g., 30-amp, 50-amp).
- Wiring: Use appropriately sized and rated wiring for your circuit's amperage. Never compromise on wire gauge. Incorrect sizing can cause overheating and fire hazards.
- Electrical box: Ensure it's rated for 220V and the appropriate amperage.
- Wire connectors (wire nuts): These secure the wire connections.
- Voltage tester: Essential for verifying power and safety.
- Wire strippers/cutters: For preparing the wires for connection.
- Screwdrivers (Phillips and flathead): For securing the outlet and other components.
- Fish tape (if needed): To pull wires through walls or ceilings.
- Level: To ensure the outlet is properly installed.
- Personal Protective Equipment (PPE): Safety glasses, work gloves, and non-conductive footwear are crucial.
How Do I Wire a 220V Outlet?
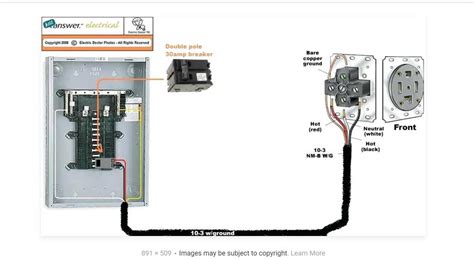
Wiring a 220V outlet is more complex than a standard 120V outlet. Incorrect wiring can be extremely dangerous and lead to electrical shock or fire. Always follow local electrical codes and regulations. This section is for informational purposes only and does not constitute professional electrical advice. Consult a qualified electrician if you are unsure about any part of this process. A typical 220V circuit uses three wires: two hot wires (usually black and red), a neutral wire (white), and a ground wire (bare copper or green). The specific wiring configuration will depend on the outlet and your existing circuit. The color codes can vary by region, so double-check the wiring diagram on your outlet and circuit breaker panel.
What are the Different Types of 220V Outlets?
220V outlets come in various configurations depending on the amperage and the appliance they power. Common types include NEMA 6-15, 6-20, 6-30, 6-50, and 14-30, 14-50 receptacles. Each has a different number of prongs and amperage rating. Always use the correct outlet for your specific appliance.
How Do I Determine the Correct Wire Gauge for my 220V Circuit?
The wire gauge is crucial for safety. Using a wire gauge that is too small for the amperage can lead to overheating and potential fires. Consult the National Electrical Code (NEC) or a qualified electrician to determine the correct wire gauge based on your amperage requirements and circuit length.
What Safety Precautions Should I Take When Installing a 220V Outlet?
- Turn off the power: Always switch off the breaker controlling the circuit before working with any electrical wiring.
- Double-check the power: Use a non-contact voltage tester to verify that the power is indeed off.
- Use proper PPE: Protect yourself with safety glasses, work gloves, and non-conductive footwear.
- Work with a partner: It is always safer to have someone assist you, especially when working with high-voltage circuits.
- Inspect your work: After completing the installation, carefully inspect all connections to ensure they are secure and properly insulated.
- Turn on the power and test: Once you’re certain everything is correct, carefully turn on the breaker and test the outlet with the appropriate appliance.
How Do I Know if My Existing Circuit Can Handle a 220V Outlet?
Determining if your existing circuit can handle a 220V outlet usually requires an inspection of your breaker panel and the existing wiring. A qualified electrician can accurately assess this and recommend any necessary upgrades.
Can I Install a 220V Outlet Myself?
While it's possible for experienced DIYers to install a 220V outlet, it's crucial to understand the risks involved. Improper installation can lead to electrical hazards, and it may void your home insurance. If you're not comfortable working with electricity, hiring a licensed electrician is the safest and most responsible option.
This guide provides a general overview of 220V outlet installation. Always prioritize safety and consult a qualified electrician if you have any doubts or concerns. Remember, working with electricity can be dangerous, so proceed with caution and prioritize safety above all else.

